GDNative пример на C++
Введение
This tutorial builds on top of the information given in the GDNative C example, so we highly recommend you read that first.
The C++ bindings for GDNative are built on top of the NativeScript GDNative API and provide a nicer way to "extend" nodes in Godot using C++. This is equivalent to writing scripts in GDScript, but in C++ instead.
You can download the full example we'll be creating in this tutorial on GitHub.
Настройка проекта
There are a few prerequisites you'll need:
a Godot 3.x executable,
a C++ compiler,
SCons as a build tool,
a copy of the godot-cpp repository.
See also Compiling as the build tools are identical to the ones you need to compile Godot from source.
Вы можете загрузить эти репозитории с GitHub или позволить Git'у сделать работу за вас. Обратите внимание, что в этих репозиториях теперь есть разные ветки для разных версий Godot. Модули GDNative, написанные для более ранней версии Godot, будут работать в новых версиях (за исключением одного изменения в интерфейсах ARVR между 3.0 и 3.1), но не наоборот, поэтому убедитесь, что вы загрузили правильную ветку. Также обратите внимание, что версия Godot, которую вы используете для генерации api.json, становится вашей минимальной версией.
Примечание
GDExtension
has been merged in the master branch of godot-cpp,
but it is only compatible with the upcoming Godot 4.0.
Therefore, you need to use the 3.x branch of godot-cpp to use GDNative
and follow this example.
This tutorial covers only GDNative in Godot 3.x, not GDExtension in Godot 4.0.
If you are versioning your project using Git, it is a good idea to add them as Git submodules:
mkdir gdnative_cpp_example
cd gdnative_cpp_example
git init
git submodule add -b 3.x https://github.com/godotengine/godot-cpp
cd godot-cpp
git submodule update --init
If you decide to just download the repositories or clone them into your project folder, make sure to keep the folder layout identical to the one described here, as much of the code we'll be showcasing here assumes the project follows this layout.
Do make sure you clone recursive to pull in both repositories:
mkdir gdnative_cpp_example
cd gdnative_cpp_example
git clone --recursive -b 3.x https://github.com/godotengine/godot-cpp
Примечание
godot-cpp now includes godot-headers as a nested submodule, if you've
manually downloaded them please make sure to place godot-headers inside
of the godot-cpp folder.
You don't have to do it this way, but we've found it easiest to manage. If you decide to download the repositories or clone them into your folder, make sure to keep the folder layout the same as we've setup here. Much of the code we'll be showcasing here assumes the project has this layout.
If you cloned the example from the link specified in the introduction, the submodules are not automatically initialized. You will need to execute the following commands:
cd gdnative_cpp_example
git submodule update --init --recursive
This will clone these two repositories into your project folder.
Building the C++ bindings
Now that we've downloaded our prerequisites, it is time to build the C++ bindings.
The repository contains a copy of the metadata for the current Godot release, but if you need to build these bindings for a newer version of Godot, simply call the Godot executable:
godot --gdnative-generate-json-api api.json
Place the resulting api.json file in the project folder and add
use_custom_api_file=yes custom_api_file=../api.json to the scons command
below.
To generate and compile the bindings, use this command (replacing <platform>
with windows, linux or osx depending on your OS):
To speed up compilation, add -jN at the end of the SCons command line where N is the number of CPU threads you have on your system. The example below uses 4 threads.
cd godot-cpp
scons platform=<platform> generate_bindings=yes -j4
cd ..
This step will take a while. When it is completed, you should have static
libraries that can be compiled into your project stored in godot-cpp/bin/.
Примечание
You may need to add bits=64 to the command on Windows or Linux.
Создание простого плагина
Now it's time to build an actual plugin. We'll start by creating an empty Godot project in which we'll place a few files.
Open Godot and create a new project. For this example, we will place it in a
folder called demo inside our GDNative module's folder structure.
In our demo project, we'll create a scene containing a Node called "Main" and
we'll save it as main.tscn. We'll come back to that later.
Back in the top-level GDNative module folder, we're also going to create a
subfolder called src in which we'll place our source files.
You should now have demo, godot-cpp, godot-headers, and src
directories in your GDNative module.
In the src folder, we'll start with creating our header file for the
GDNative node we'll be creating. We will name it gdexample.h:
#ifndef GDEXAMPLE_H
#define GDEXAMPLE_H

#include <Godot.hpp>
#include <Sprite.hpp>

namespace godot {

class GDExample : public Sprite {
    GODOT_CLASS(GDExample, Sprite)

private:
    float time_passed;

public:
    static void _register_methods();

    GDExample();
    ~GDExample();

    void _init(); // our initializer called by Godot

    void _process(float delta);
};

}

#endif
There are a few things of note to the above. We're including Godot.hpp which
contains all our basic definitions. After that, we include Sprite.hpp which
contains bindings to the Sprite class. We'll be extending this class in our
module.
We're using the namespace godot, since everything in GDNative is defined
within this namespace.
Then we have our class definition, which inherits from our Sprite through a
container class. We'll see a few side effects of this later on. The
GODOT_CLASS macro sets up a few internal things for us.
После этого мы объявляем единственную переменную с именем time_passed.
In the next block we're defining our methods, we obviously have our constructor and destructor defined, but there are two other functions that will likely look familiar to some, and one new method.
Первая - _register_methods, которая является статической функцией, которую Godot будет вызывать, чтобы узнать, какие методы можно вызвать на нашем NativeScript и какие свойства он раскрывает. Вторая - это наша функция _process, которая будет работать точно так же, как и функция _process, к которой вы привыкли в GDScript. Третья - это наша функция _init, которая вызывается после того, как Godot правильно установит наш объект. Он должен существовать, даже если вы не помещаете в него никакого кода.
Let's implement our functions by creating our gdexample.cpp file:
#include "gdexample.h"

using namespace godot;

void GDExample::_register_methods() {
    register_method("_process", &GDExample::_process);
}

GDExample::GDExample() {
}

GDExample::~GDExample() {
    // add your cleanup here
}

void GDExample::_init() {
    // initialize any variables here
    time_passed = 0.0;
}

void GDExample::_process(float delta) {
    time_passed += delta;

    Vector2 new_position = Vector2(10.0 + (10.0 * sin(time_passed * 2.0)), 10.0 + (10.0 * cos(time_passed * 1.5)));

    set_position(new_position);
}
This one should be straightforward. We're implementing each method of our class
that we defined in our header file. Note that the register_method call
must expose the _process method, otherwise Godot will not be able to use
it. However, we do not have to tell Godot about our constructor, destructor and
_init functions.
Другим методом, заслуживающим внимания, является наша функция _process, которая просто отслеживает, сколько времени прошло, и рассчитывает новую позицию для нашего спрайта с помощью функции синуса и косинуса. Что выделяется, так это вызов owner->set_position для вызова одного из встроенных методов нашего спрайта. Это происходит потому, что наш класс является контейнерным классом; owner указывает на фактический узел спрайта, к которому относится наш скрипт.
Есть ещё один файл C++, который нам нужен; мы назовём его gdlibrary.cpp. Наш GDNative плагин может содержать несколько NativeScripts, каждый со своим заголовком и исходным файлом, такими, как мы реализовывали GDExample выше. Всё что нам нужно это небольшая часть кода, которая говорит Godot обо всех NativeScripts в нашем GDNative плагине.
#include "gdexample.h"

extern "C" void GDN_EXPORT godot_gdnative_init(godot_gdnative_init_options *o) {
    godot::Godot::gdnative_init(o);
}

extern "C" void GDN_EXPORT godot_gdnative_terminate(godot_gdnative_terminate_options *o) {
    godot::Godot::gdnative_terminate(o);
}

extern "C" void GDN_EXPORT godot_nativescript_init(void *handle) {
    godot::Godot::nativescript_init(handle);

    godot::register_class<godot::GDExample>();
}
Note that we are not using the godot namespace here, since the three
functions implemented here need to be defined without a namespace.
The godot_gdnative_init and godot_gdnative_terminate functions get
called respectively when Godot loads our plugin and when it unloads it. All
we're doing here is parse through the functions in our bindings module to
initialize them, but you might have to set up more things depending on your
needs.
The important function is the third function called godot_nativescript_init.
We first call a function in our bindings library that does its usual stuff.
After that, we call the function register_class for each of our classes in
our library.
Компиляция плагина
We cannot easily write by hand a SConstruct file that SCons would use for
building. For the purpose of this example, just use
this hardcoded SConstruct file we've
prepared. We'll cover a more customizable, detailed example on how to use these
build files in a subsequent tutorial.
Примечание
This SConstruct file was written to be used with the latest godot-cpp
master, you may need to make small changes using it with older versions or
refer to the SConstruct file in the Godot 3.0 documentation.
Once you've downloaded the SConstruct file, place it in your GDNative module
folder besides godot-cpp, godot-headers and demo, then run:
scons platform=<platform>
You should now be able to find the module in demo/bin/<platform>.
Примечание
Here, we've compiled both godot-cpp and our gdexample library as debug
builds. For optimized builds, you should compile them using the
target=release switch.
Using the GDNative module
Before we jump back into Godot, we need to create two more files in
demo/bin/. Both can be created using the Godot editor, but it may be faster
to create them directly.
The first one is a file that lets Godot know what dynamic libraries should be
loaded for each platform and is called gdexample.gdnlib.
[general]

singleton=false
load_once=true
symbol_prefix="godot_"
reloadable=false

[entry]

X11.64="res://bin/x11/libgdexample.so"
Windows.64="res://bin/win64/libgdexample.dll"
OSX.64="res://bin/osx/libgdexample.dylib"

[dependencies]

X11.64=[]
Windows.64=[]
OSX.64=[]
This file contains a general section that controls how the module is loaded.
It also contains a prefix section which should be left on godot_ for now. If
you change this, you'll need to rename various functions that are used as entry
points. This was added for the iPhone platform because it doesn't allow dynamic
libraries to be deployed, yet GDNative modules are linked statically.
Раздел entry - это важный бит: он сообщает Godot расположение динамической библиотеки в файловой системе проекта для каждой поддерживаемой платформы. Это также приведет к экспорту только этого файла при экспорте проекта, что означает, что пакет данных не будет содержать библиотек, несовместимых с целевой платформой.
Наконец, раздел зависимости позволяет вам указать дополнительные динамические библиотеки, которые также должны быть включены. Это важно, когда ваш плагин GDNative реализует чужую библиотеку и требует, чтобы вы предоставили стороннюю динамическую библиотеку вместе с проектом.
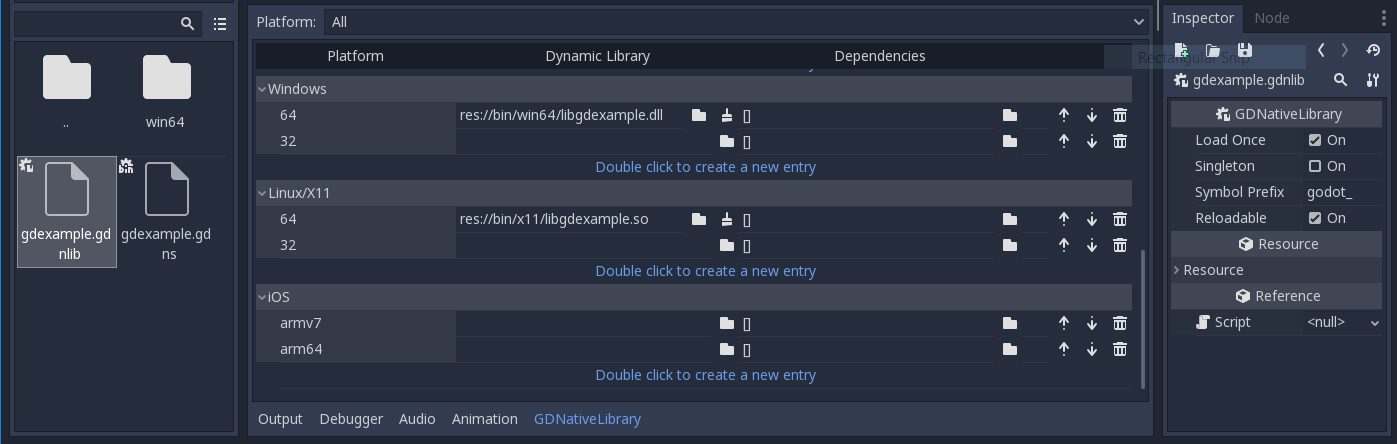
Если вы дважды щелкните по файлу gdexample.gdnlib в Godot, вы увидите, что есть гораздо больше опций, которые можно установить:
Второй файл, который нам нужно создать, - это файл, используемый каждым NativeScript, который мы добавили в наш плагин. Мы назовем его gdexample.gdns для нашего NativeScript gdexample.
[gd_resource type="NativeScript" load_steps=2 format=2]

[ext_resource path="res://bin/gdexample.gdnlib" type="GDNativeLibrary" id=1]

[resource]

resource_name = "gdexample"
class_name = "GDExample"
library = ExtResource( 1 )
Это стандартный ресурс Godot; вы могли бы просто создать его непосредственно в сцене, но сохранение его в файл значительно упрощает его повторное использование в других местах. Этот ресурс указывает на наш файл gdnlib, чтобы Godot мог знать, какая динамическая библиотека содержит наш NativeScript. Он также определяет class_name, который идентифицирует NativeScript в нашем плагине, который мы хотим использовать.
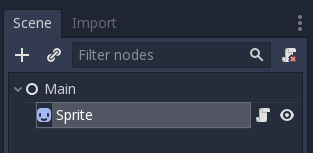
Пора вернуться в Godot. Мы загрузим главную сцену, которую мы создали в самом начале, и теперь добавим спрайт в нашу сцену:
Мы назначим логотип Godot этому спрайту в качестве текстуры, отключим свойство centered и перетащим наш файл gdexample.gdns на свойство cript спрайта:
Наконец-то мы готовы к запуску проекта:
Добавление свойств
GDScript позволяет добавлять свойства в сценарий с помощью ключевого слова export. В GDNative вы должны зарегистрировать свойства, и есть два способа сделать это. Вы можете либо привязаться непосредственно к члену, либо использовать функции setter и getter.
Примечание
There is a third option, just like in GDScript you can directly implement the
_get_property_list, _get and _set methods of an object but that
goes far beyond the scope of this tutorial.
We'll examine both starting with the direct bind. Lets add a property that allows us to control the amplitude of our wave.
In our gdexample.h file we simply need to add a member variable like so:
...
private:
    float time_passed;
    float amplitude;
...
In our gdexample.cpp file we need to make a number of changes, we will only
show the methods we end up changing, don't remove the lines we're omitting:
void GDExample::_register_methods() {
    register_method("_process", &GDExample::_process);
    register_property<GDExample, float>("amplitude", &GDExample::amplitude, 10.0);
}

void GDExample::_init() {
    // initialize any variables here
    time_passed = 0.0;
    amplitude = 10.0;
}

void GDExample::_process(float delta) {
    time_passed += delta;

    Vector2 new_position = Vector2(
        amplitude + (amplitude * sin(time_passed * 2.0)),
        amplitude + (amplitude * cos(time_passed * 1.5))
    );

    set_position(new_position);
}
Once you compile the module with these changes in place, you will see that a property has been added to our interface. You can now change this property and when you run your project, you will see that our Godot icon travels along a larger figure.
Примечание
The reloadable property in the gdexample.gdnlib file must be set to
true for the Godot editor to automatically pick up the newly added
property.
However, this setting should be used with care, especially when tool classes are used, as the editor might hold objects then that have script instances attached to them that are managed by a GDNative library.
Let's do the same but for the speed of our animation and use a setter and getter
function. Our gdexample.h header file again only needs a few more lines of
code:
...
    float amplitude;
    float speed;
...
    void _process(float delta);
    void set_speed(float p_speed);
    float get_speed();
...
This requires a few more changes to our gdexample.cpp file, again we're only
showing the methods that have changed so don't remove anything we're omitting:
void GDExample::_register_methods() {
    register_method("_process", &GDExample::_process);
    register_property<GDExample, float>("amplitude", &GDExample::amplitude, 10.0);
    register_property<GDExample, float>("speed", &GDExample::set_speed, &GDExample::get_speed, 1.0);
}

void GDExample::_init() {
    // initialize any variables here
    time_passed = 0.0;
    amplitude = 10.0;
    speed = 1.0;
}

void GDExample::_process(float delta) {
    time_passed += speed * delta;

    Vector2 new_position = Vector2(
        amplitude + (amplitude * sin(time_passed * 2.0)),
        amplitude + (amplitude * cos(time_passed * 1.5))
    );

    set_position(new_position);
}

void GDExample::set_speed(float p_speed) {
    speed = p_speed;
}

float GDExample::get_speed() {
    return speed;
}
Now when the project is compiled, we'll see another property called speed. Changing its value will make the animation go faster or slower.
For this example, there is no obvious advantage of using a setter and getter. A good reason for a setter would be if you wanted to react on the variable being changed. If you don't need to do something like that, binding the variable is enough.
Getters and setters become far more useful in more complex scenarios where you need to make additional choices based on the state of your object.
Примечание
For simplicity, we've left out the optional parameters in the
register_property<class, type> method call. These parameters are
rpc_mode, usage, hint and hint_string. These can be used to
further configure how properties are displayed and set on the Godot side.
Modern C++ compilers are able to infer the class and variable type and allow
you to omit the <GDExample, float> part of our register_property
method. We've had mixed experiences with this however.
Сигналы
Last but not least, signals fully work in GDNative as well. Having your module
react to a signal given out by another object requires you to call connect
on that object. We can't think of a good example for our wobbling Godot icon, we
would need to showcase a far more complete example.
This is the required syntax:
some_other_node->connect("the_signal", this, "my_method");
Note that you can only call my_method if you've previously registered it in
your _register_methods method.
Having your object sending out signals is more common. For our wobbling Godot icon, we'll do something silly just to show how it works. We're going to emit a signal every time a second has passed and pass the new location along.
In our gdexample.h header file, we need to define a new member time_emit:
...
    float time_passed;
    float time_emit;
    float amplitude;
...
This time, the changes in gdexample.cpp are more elaborate. First,
you'll need to set time_emit = 0.0; in either our _init method or in our
constructor. We'll look at the other 2 needed changes one by one.
In our _register_methods method, we need to declare our signal. This is done
as follows:
void GDExample::_register_methods() {
    register_method("_process", &GDExample::_process);
    register_property<GDExample, float>("amplitude", &GDExample::amplitude, 10.0);
    register_property<GDExample, float>("speed", &GDExample::set_speed, &GDExample::get_speed, 1.0);

    register_signal<GDExample>((char *)"position_changed", "node", GODOT_VARIANT_TYPE_OBJECT, "new_pos", GODOT_VARIANT_TYPE_VECTOR2);
}
Here, our register_signal method can be a single call first taking the
signals name, then having pairs of values specifying the parameter name and
type of each parameter we'll send along with this signal.
Next, we'll need to change our _process method:
void GDExample::_process(float delta) {
    time_passed += speed * delta;

    Vector2 new_position = Vector2(
        amplitude + (amplitude * sin(time_passed * 2.0)),
        amplitude + (amplitude * cos(time_passed * 1.5))
    );

    set_position(new_position);

    time_emit += delta;
    if (time_emit > 1.0) {
        emit_signal("position_changed", this, new_position);

        time_emit = 0.0;
    }
}
After a second has passed, we emit our signal and reset our counter. We can add
our parameter values directly to emit_signal.
Once the GDNative library is compiled, we can go into Godot and select our sprite node. In the Node dock, we can find our new signal and link it up by pressing the Connect button or double-clicking the signal. We've added a script on our main node and implemented our signal like this:
extends Node

func _on_Sprite_position_changed(node, new_pos):
    print("The position of " + node.name + " is now " + str(new_pos))
Every second, we output our position to the console.
Следующие шаги
The above is only a simple example, but we hope it shows you the basics. You can build upon this example to create full-fledged scripts to control nodes in Godot using C++.
To edit and recompile the plugin while the Godot editor remains open, re-run the project after the library has finished building.