Attention: Here be dragons
This is the latest
(unstable) version of this documentation, which may document features
not available in or compatible with released stable versions of Godot.
Checking the stable version of the documentation...
Прыжки и раздавливание монстров
В этой части мы добавим возможность прыгать, чтобы раздавливать монстров. В следующем уроке мы сделаем так, чтобы игрок умирал, когда монстр ударяет его о землю.
Во-первых, мы должны изменить несколько настроек, связанных с физическими взаимодействиями. Ознакомьтесь с физические слои.
Управление физическими взаимодействиями
Физические тела имеют доступ к двум дополнительным свойствам: слоям и маскам. Слои определяют, на каком физическом слое (слоях) находится объект.
Маски управляют слоями, которые будут воспринимать и обнаруживать тело. Это влияет на обнаружение столкновений. Когда вы хотите, чтобы два тела взаимодействовали, необходимо, чтобы хотя бы одно из них имело маску, соответствующую другому.
Если это вас смущает, не волнуйтесь, через секунду мы увидим три примера.
Важным моментом является то, что вы можете использовать слои и маски для фильтрации физического взаимодействия, контроля производительности и устранения необходимости в дополнительных условиях в вашем коде.
По умолчанию все физические тела и зоны имеют значения всех масок и слоев равных 1. Это означает, что все они сталкиваются друг с другом.
Физические слои представлены числами, но мы можем дать им имена, чтобы отслеживать, что есть что.
Установка имен слоев
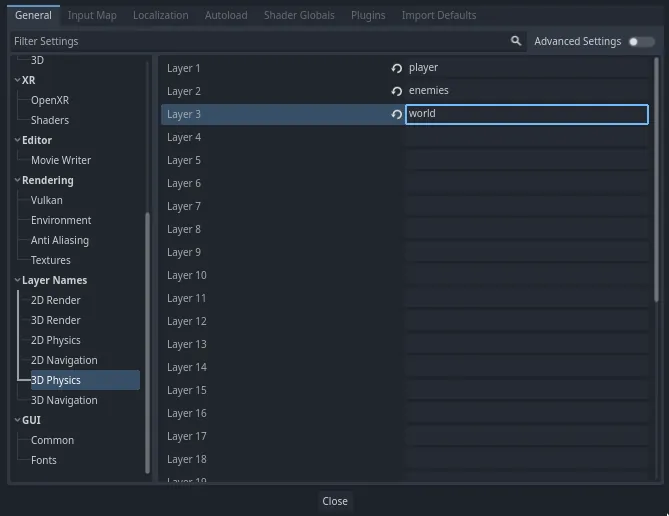
Давайте дадим нашим физическим слоям имя. Перейдите в раздел Project -> Project Settings (Проект -> Настройки проекта).

В левом меню перейдите вниз по ссылке Имена слоя -> Физика 3D. Справа вы увидите список слоёв с полем рядом с каждым из них. Там вы можете задать их имена. Назовите первые три слоя player, enemies, и world, соответственно.
Теперь мы можем назначить их нашим физическим узлам.
Назначение слоев и масок
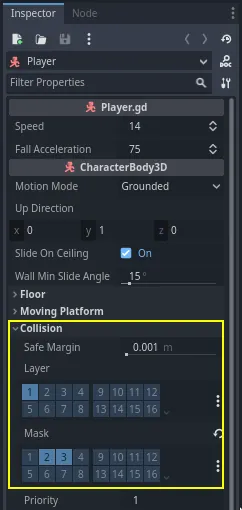
В сцене Main выберите узел Ground. В инспекторе разверните раздел Collision. Там вы увидите слои и маски узла в виде сетки кнопок.
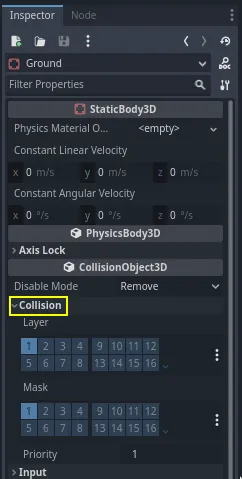
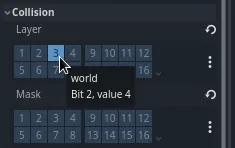
Земля является частью мира, поэтому мы хотим, чтобы она была частью третьего слоя. Нажмите на кнопку с подсветкой, чтобы выключить первый слой Layer и включить третий. Затем отключите Mask, щёлкнув по ней.
Как я уже упоминал, свойство Mask позволяет узлу слушать взаимодействие с другими физическими объектами, но нам не нужно, чтобы у него были столкновения. Свойству Ground не нужно ничего слушать; оно просто находится там, чтобы предотвратить падение существ.
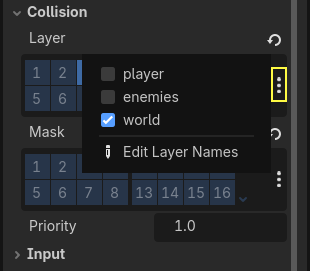
Обратите внимание, что вы можете нажать кнопку "..." в правой части свойств, чтобы увидеть список именованных флажков.
Далее следуют Player и Mob. Откройте player.tscn, дважды щёлкнув по файлу в панели Файловая система.
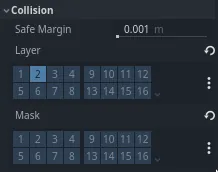
Выберите узел Player и установите его свойство Collision -> Mask на "enemies" и "world". Вы можете не изменять свойство Layer, так как первый слой - это слой "игрока" (player).
Затем откройте сцену Mob, дважды щёлкнув на mob.tscn и выбрав узел Mob.
Установите его Collision -> Layer на "enemies" и снимите его Collision -> Mask, оставив маску пустой.
Эти настройки означают, что монстры будут двигаться друг сквозь друга. Если вы хотите, чтобы монстры сталкивались и скользили друг по другу, включите маску "enemies".
Примечание
Мобам не нужно маскировать слой "world", потому что они движутся только в плоскости XZ. Мы не применяем к ним гравитацию.
Прыжки
Сама механика прыжков требует всего двух строк кода. Откройте скрипт Player. Нам нужно значение для контроля силы прыжка и обновления _physics_process() для кодирования прыжка.
После строки, определяющей fall_acceleration, в верхней части скрипта добавьте строку jump_impulse.
#...
# Vertical impulse applied to the character upon jumping in meters per second.
@export var jump_impulse = 20
// Don't forget to rebuild the project so the editor knows about the new export variable.

// ...
// Vertical impulse applied to the character upon jumping in meters per second.
[Export]
public int JumpImpulse { get; set; } = 20;
Внутри _physics_process(), добавьте следующий код перед строкой, где мы вызвали блок кода с move_and_slide().
func _physics_process(delta):
    #...

    # Jumping.
    if is_on_floor() and Input.is_action_just_pressed("jump"):
        target_velocity.y = jump_impulse

    #...
public override void _PhysicsProcess(double delta)
{
    // ...

    // Jumping.
    if (IsOnFloor() && Input.IsActionJustPressed("jump"))
    {
        _targetVelocity.Y = JumpImpulse;
    }

    // ...
}
Это всё, что вам нужно для прыжка!
Метод is_on_floor() является инструментом класса CharacterBody3D. Он возвращает значение true, если тело столкнулось с полом в этом кадре. Вот почему мы применяем гравитацию к Player : так мы сталкиваемся с полом, а не парим над ним как монстры.
Если персонаж стоит на полу и игрок нажимает кнопку "прыжок", мы мгновенно придаем ему большую вертикальную скорость. В играх очень важно, чтобы управление было отзывчивым, а такие мгновенные прибавки скорости, хотя и нереалистичны, но ощущаются отлично.
Обратите внимание, что ось +Y направлен вверх. Это отличается от 2D, где ось +Y направлена вниз.
Раздавливание монстров
Далее добавим механику давки. Мы заставим персонажа подпрыгивать над монстрами и одновременно убивать их.
Нам нужно обнаружить столкновения с монстром и отличить их от столкновений с полом. Для этого мы можем использовать функцию тегов Godot group.
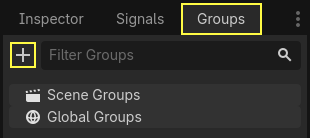
Снова откройте сцену mob.tscn и выберите узел Mob. Перейдите в панель Groups справа, чтобы увидеть список групп, позволяющий назначать теги узлам. Нажмите кнопку +, чтобы открыть диалоговое окно Create new Group.
Введите "mob" в поле Name и нажмите на кнопку Ok.
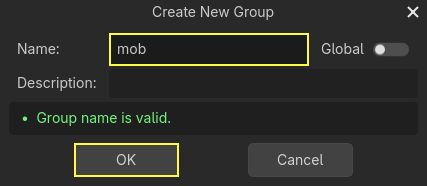
Группа "mob" теперь отображается в разделе Scene Groups.
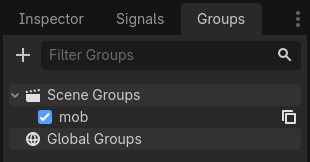
В панели Сцена появится иконка, указывающая на то, что узел является частью по крайней мере одной группы.
![]()
Теперь мы можем использовать группу из кода, чтобы отличить столкновения с монстрами от столкновений с полом.
Программирование механики давки
Вернитесь к скрипту Player, чтобы запрограммировать давку и отскок.
В верхней части скрипта нам нужно еще одно свойство, bounce_impulse. При раздавливании врага мы не обязательно хотим, чтобы персонаж поднимался так же высоко, как при прыжке.
# Vertical impulse applied to the character upon bouncing over a mob in
# meters per second.
@export var bounce_impulse = 16
// Don't forget to rebuild the project so the editor knows about the new export variable.

// Vertical impulse applied to the character upon bouncing over a mob in meters per second.
[Export]
public int BounceImpulse { get; set; } = 16;
Затем, после блока кода с прыжком, в нижней части _physics_process(), добавьте следующий цикл. В move_and_slide(), Godot заставляет тело двигаться иногда несколько раз подряд, чтобы сгладить движение персонажа. Поэтому мы должны перебрать все столкновения, которые могли произойти.
В каждой итерации цикла мы проверяем, приземлились ли мы на моба. Если да, то мы убиваем его и отскакиваем.
При таком коде, если на данном кадре не произошло ни одного столкновения, цикл не будет выполняться.
func _physics_process(delta):
    #...

    # Iterate through all collisions that occurred this frame
    for index in range(get_slide_collision_count()):
        # We get one of the collisions with the player
        var collision = get_slide_collision(index)

        # If there are duplicate collisions with a mob in a single frame
        # the mob will be deleted after the first collision, and a second call to
        # get_collider will return null, leading to a null pointer when calling
        # collision.get_collider().is_in_group("mob").
        # This block of code prevents processing duplicate collisions.
        if collision.get_collider() == null:
            continue

        # If the collider is with a mob
        if collision.get_collider().is_in_group("mob"):
            var mob = collision.get_collider()
            # we check that we are hitting it from above.
            if Vector3.UP.dot(collision.get_normal()) > 0.1:
                # If so, we squash it and bounce.
                mob.squash()
                target_velocity.y = bounce_impulse
                # Prevent further duplicate calls.
                break
public override void _PhysicsProcess(double delta)
{
    // ...

    // Iterate through all collisions that occurred this frame.
    for (int index = 0; index < GetSlideCollisionCount(); index++)
    {
        // We get one of the collisions with the player.
        KinematicCollision3D collision = GetSlideCollision(index);

        // If the collision is with a mob.
        // With C# we leverage typing and pattern-matching
        // instead of checking for the group we created.
        if (collision.GetCollider() is Mob mob)
        {
            // We check that we are hitting it from above.
            if (Vector3.Up.Dot(collision.GetNormal()) > 0.1f)
            {
                // If so, we squash it and bounce.
                mob.Squash();
                _targetVelocity.Y = BounceImpulse;
                // Prevent further duplicate calls.
                break;
            }
        }
    }
}
Это большое количество новых функций. Вот дополнительная информация о них.
Обе функции get_slide_collision_count() и get_slide_collision() происходят из класса CharacterBody3D и связаны с move_and_slide().
get_slide_collision() возвращает объект KinematicCollision3D, который содержит информацию о том, где и как произошло столкновение. Например, мы используем его свойство get_collider, чтобы проверить, столкнулись ли мы с "мобом", вызвав is_in_group(): collision.get_collider().is_in_group("mob").
Примечание
Метод is_in_group() доступен для каждого Node.
Чтобы проверить, что мы приземляемся на монстра, мы используем векторное скалярное произведение (dot product): Vector3.UP.dot(collision.get_normal()) > 0.1. Нормаль столкновения - это трёхмерный вектор, перпендикулярный плоскости, в которой произошло столкновение. Скалярное произведение позволяет нам сравнить его с направлением вверх.
При использовании скалярных произведений результат больше, чем 0, когда два вектора находятся под углом менее 90 градусов. Значение больше, чем 0.1 говорит нам о том, что мы находимся примерно над монстром.
После обработки логики раздавливания и отскока мы досрочно завершаем цикл с помощью оператора break, чтобы предотвратить дальнейшие дублирующие вызовы mob.squash(), которые в противном случае могут привести к непреднамеренным ошибкам, таким как подсчет очков несколько раз за одно убийство.
Мы вызываем одну неопределённую функцию, mob.squash() поэтому мы должны добавить её в класс Mob.
Откройте скрипт mob.gd, дважды щёлкнув на нём в панели Файловая система. В верхней части скрипта мы хотим определить новый сигнал с именем squashed. А внизу можно добавить функцию раздавливания, в которой мы отправим сигнал и уничтожим моба.
# Emitted when the player jumped on the mob.
signal squashed

# ...


func squash():
    squashed.emit()
    queue_free()
// Don't forget to rebuild the project so the editor knows about the new signal.

// Emitted when the player jumped on the mob.
[Signal]
public delegate void SquashedEventHandler();

// ...

public void Squash()
{
    EmitSignal(SignalName.Squashed);
    QueueFree();
}
Примечание
При использовании C# Godot будет автоматически создавать соответствующие события для всех сигналов, заканчивающихся на EventHandler, см. C# сигналы.
Мы будем использовать сигнал для добавления очков к счёту в следующем уроке.
С помощью этого вы сможете убивать монстров, прыгая на них. Вы можете нажать F5, чтобы попробовать игру и установить main.tscn в качестве основной сцены вашего проекта.
Однако игрок еще не умрёт. Мы поработаем над этим в следующей части.